
Article: The Secret to Seamless Makeup: 4-Step Color Placement Guide
The Secret to Seamless Makeup: 4-Step Color Placement Guide
How to Apply Makeup for a Naturally Sculpted Face (Without the Overload)
Makeup isn’t about masking—it's about enhancing. With the right product placement, you can bring out your best features in just four steps. Our color-coded visual makes it simple to follow.
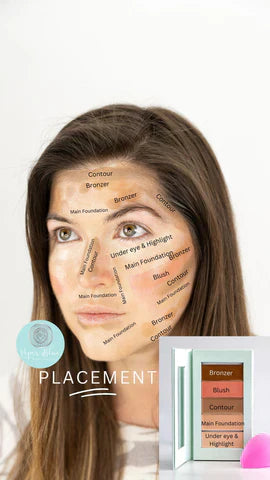
4 Key Products & Where They Go
🎯 Main Foundation (Medium Beige)
Your even-toned canvas. Apply to the lower cheeks, jaw, and chin area.
🎯 Light Foundation (Ivory/Highlight)
Brighten under the eyes, the center of the forehead, chin, and bridge of the nose.
🎯 Contour (Cool Brown)
Apply to the hollows of the cheeks, around the forehead, and jawline to sculpt and define.
🎯 Blush (Rosy Pink)
Tap onto the upper cheekbones for a lifted, fresh glow.
See the Difference
In the left image, you see strategic placement before blending. On the right? The finished, glowing result—no filters needed.
When you layer with purpose, you reduce cakiness and amplify natural beauty.
Tips for Blending Like a Pro:
-
Start with a damp sponge or dense brush
-
Use tapping (not sweeping) motions
-
Blend light into dark for a natural fade

Written by Jamie Jensen
%0AMakeup%20isn%E2%80%99t%20about%20masking%E2%80%94it's%20about%20enhancing.%20With%20the%20right%20product%20placement,%20you%20can%20bring%20out%20your%20best%20features%20in%20j...)
Leave a comment
This site is protected by hCaptcha and the hCaptcha Privacy Policy and Terms of Service apply.